 PixNip
 The PixNip guide
Everything PixNip can do, and how to do it fast. New here? Read Install & set up and Capturing; you'll be productive in two minutes.
Feature overview
PixNip lives in your menu bar. One shortcut opens a frozen, pixel-perfect capture overlay; what happens next is up to you.
Install & set up
- Open the PixNip disk image and drag PixNip into Applications. Launch it. The PixNip icon appears in your menu bar. PixNip needs macOS 14 Sonoma or later, on Apple silicon or Intel.
- The welcome tour opens. Click Grant Permission and enable PixNip under System Settings → Privacy & Security → Screen & System Audio Recording. macOS may ask you to quit and reopen PixNip. Every screenshot app needs this permission; PixNip never uploads anything.
- Choose your shortcuts. Keep PixNip on ⇧⌘1/⇧⌘2, or switch on Use ⇧⌘3, ⇧⌘4 and ⇧⌘5 for PixNip (see Shortcuts).
- Optionally turn on Launch PixNip at login on the last page of the tour.
Shortcuts at a glance
Global shortcuts
| Action | Default | Notes |
|---|---|---|
| Capture anything | ⇧⌘1 | The overlay opens; drag or click a window, or press a letter to switch mode (below). The only shortcut you need. |
| Capture fullscreen | ⇧⌘2 | Captures the display under the mouse. |
| Capture text (OCR) | ⌃⇧⌘1 | Drag over text; it's copied to the clipboard. |
| Start / finish Stack | ⌃⇧⌘2 | Press again to open all shots in the editor. |
| Scrolling capture PRO | ⌃⇧⌘5 | |
| Window, recording, web page, history | none | Use the overlay letters or the menu bar, or assign keys in Settings. |
Text, Stack and Scrolling have their own keys for people who want a key per action; everyone else can stick to ⇧⌘1 and a letter. Change any of these in Settings → Shortcuts. PixNip warns you if a combination is already used.
Use ⇧⌘3 / ⇧⌘4 / ⇧⌘5
Turn on Use ⇧⌘3, ⇧⌘4 and ⇧⌘5 for PixNip in Settings → Shortcuts (or during the tour). PixNip then answers to ⇧⌘3 fullscreen, ⇧⌘4 area or window, and ⇧⌘5 record. ⇧⌘4 takes over from ⇧⌘1 as your “capture anything” key, so wherever this guide says ⇧⌘1, press ⇧⌘4 instead; the overlay letters work the same. macOS only lets PixNip have those keys once Apple's own screenshot shortcuts are off. PixNip shows an orange warning until they are; click Open Keyboard Shortcuts… and switch off everything under Screenshots. The warning turns green as soon as PixNip has the keys.
In the capture overlay
| Key | Does |
|---|---|
| A | Area mode: drag a rectangle, or click a window to capture its rectangle. |
| W | Window mode: click a window to capture it (with its shadow, even if partly covered). |
| F | Use the whole display: capture it immediately (in Text or Recording mode, read or record the whole display). |
| T | Text mode: drag over text to copy it. |
| S PRO | Scrolling mode: select the area that scrolls. |
| R PRO | Recording mode: select the region to record. |
| K | Stack: this shot starts a stack, and every shot after it joins the tray. Press K again to cancel. See Stack mode. |
| C | Copy the hex color under the cursor. |
| Hold Space | While dragging: move the selection instead of resizing it. |
| Esc / right-click | Cancel. |
Capturing
Press ⇧⌘1 (or choose Capture Area from the menu bar). The screen freezes so nothing changes while you select. A bar at the bottom shows the current mode and the letter keys.
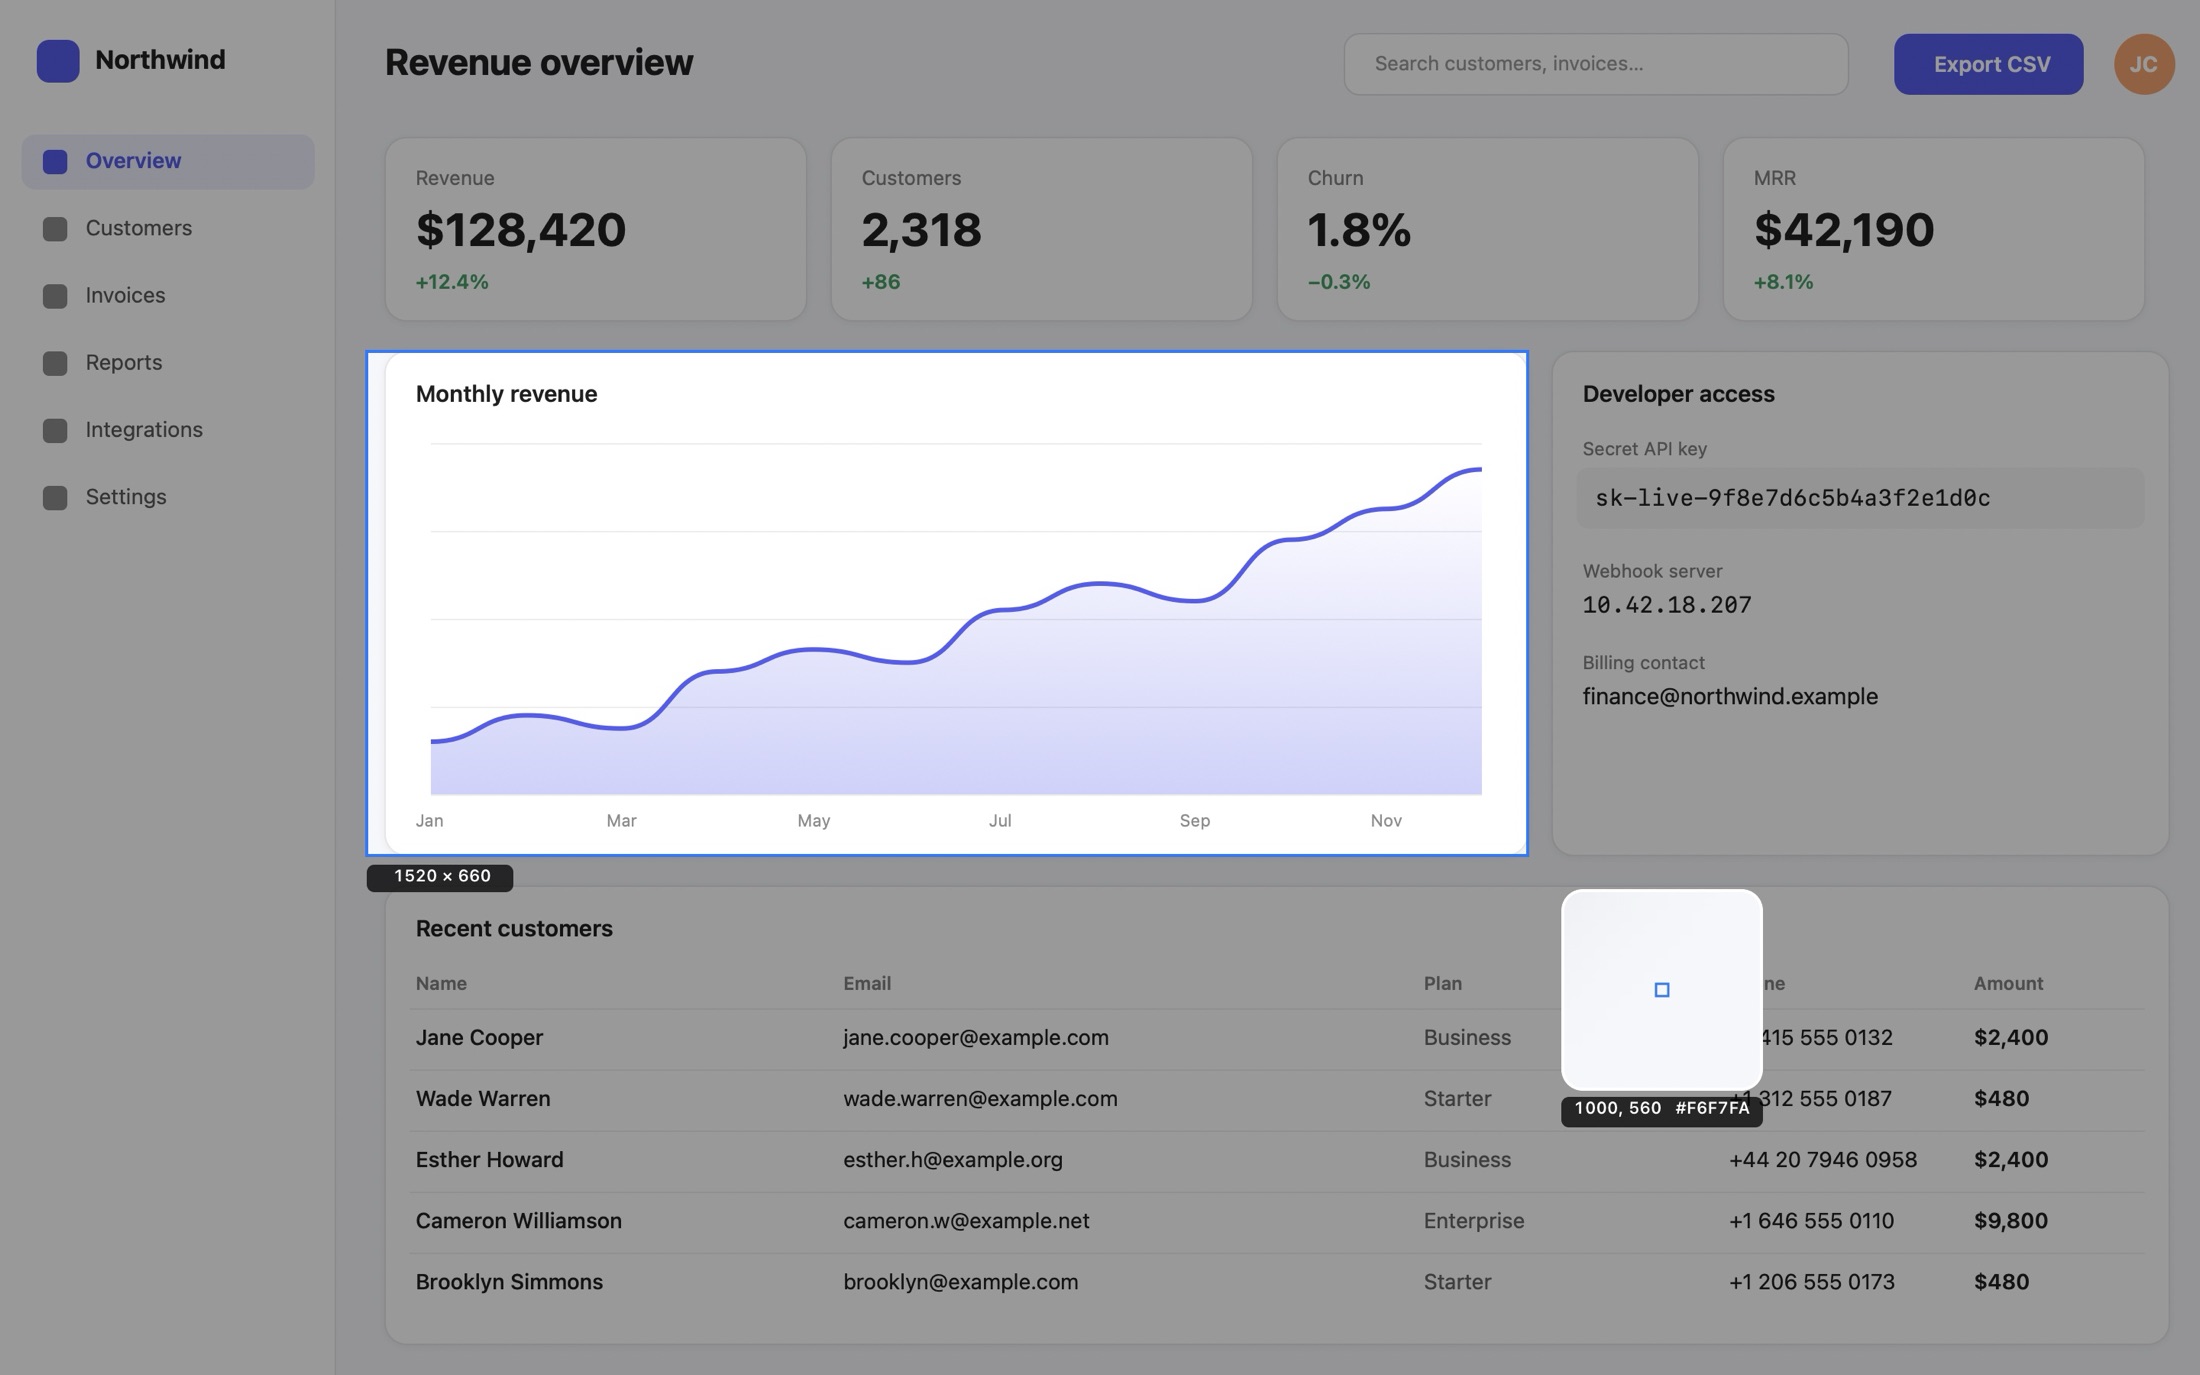
- Drag to select an area. The label shows the pixel size; the loupe shows the exact pixel and its color, so you can line up edges perfectly.
- Click without dragging to capture the window under the cursor, exactly as it appears on screen. It's highlighted as you hover. For the window on its own with its shadow, even if it's partly covered, press W first.
- Multiple displays are frozen together; select on whichever display you like.
- Window mode (W) and Capture Window include the window's shadow on a transparent background. Turn this off in Settings → General → Include shadow in window captures.
What happens after a capture is set in Settings → General → After capture: show Quick Access (default), copy to clipboard, save to your folder, or open the editor. Always copy to clipboard copies every capture in addition to that (except shots going into a stack or a workflow).
Quick Access
After each capture a thumbnail appears in the bottom-left corner. Hover it for actions:
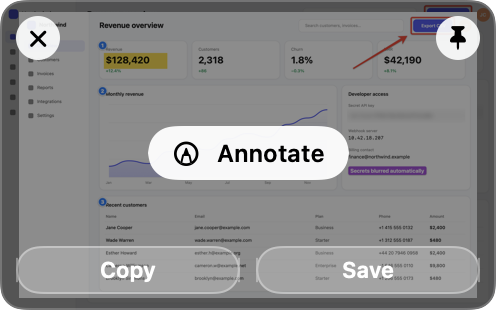
- Annotate opens the editor. Copy and Save do just that. The pin button floats it on screen; × dismisses it.
- Drag the thumbnail straight into Mail, Slack, Finder or any app that accepts images.
- New captures stack upward, up to five. Cards stay until dismissed, or close automatically after 5, 10 or 30 seconds (Settings → General → Quick Access closes). Hovering pauses the timer.
- On the free version, a card occasionally offers Frame it with Pro, which opens the shot with a Beautify preview. It shows up at most once every two weeks.
Stack mode
For bug reports, how-tos and emails that need several screenshots.
- Press ⇧⌘1, then K, and take the first shot (or choose Start Stack in the menu bar, or press ⌃⇧⌘2). A tray appears on the right edge of the screen.
- Capture as usual with your shortcuts or the tray's Area, Window and Screen buttons. Each shot lands in the tray, numbered.
- Drag thumbnails to reorder them; click × to remove one. Copy all to clipboard copies every shot as files you can paste into Mail or Slack.
- Click Annotate all (or press ⌃⇧⌘2 again) to open every shot in one editor window, with a sidebar and a caption field per step.
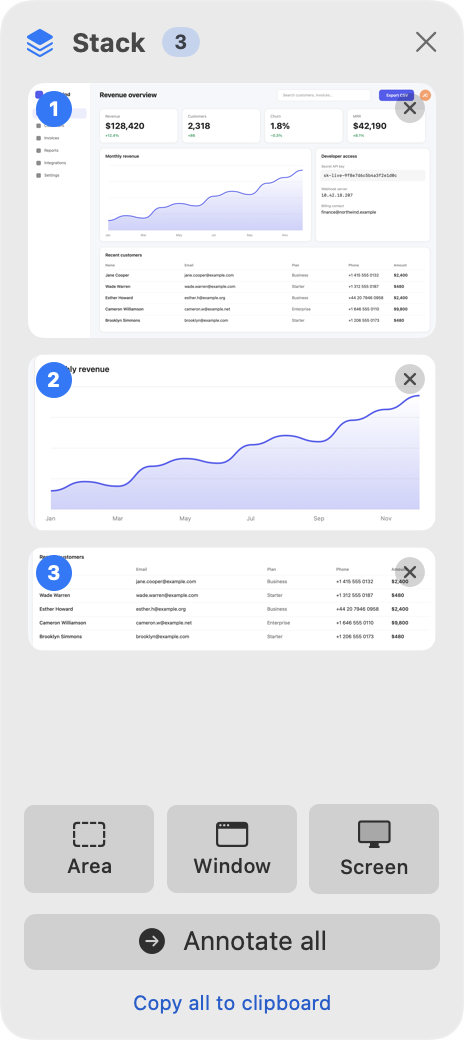
To throw a stack away, click × at the top of the tray or choose Discard Stack from the menu bar. The free version holds 3 shots per stack; Pro is unlimited.
Scrolling capture PRO
Captures content taller than the screen (long chats, documents, feeds, settings pages) in any app.
- Press ⌃⇧⌘5, or S in the overlay. Select the area that scrolls (clicking a window works too).
- A dashed border and a control bar appear. Scroll down slowly. PixNip captures continuously and stitches each new part on. The counter shows the height captured so far.
- Or click Auto-scroll and let PixNip scroll for you. It stops by itself at the bottom. The first time, macOS asks you to allow PixNip under Accessibility, which is needed to send scroll events.
- Click Done. The tall image goes to Quick Access (or your chosen after-capture action).
Capture Web Page PRO
Renders a complete web page from its address. No browser extension needed.
- With the page open in Safari, Chrome, Arc, Brave, Edge, Vivaldi or Opera, choose Capture Web Page… from the menu bar. The address is filled in for you (macOS asks once for permission to read it). You can also paste any URL.
- Pick a width: Desktop 1440, Laptop 1280, Tablet 820 or Mobile 390, which uses a phone browser identity.
- Click Capture. PixNip loads the page, triggers lazy-loaded content, hides sticky bars that would repeat, and stitches the full height (up to 30,000 points).
Screen recording PRO
- Choose Record Screen from the menu bar, press R in the overlay, or use ⇧⌘5 if you've enabled the macOS shortcuts. Select the region to record.
- A red dashed border and a timer show that recording is on. Stop with the ■ button, Stop Recording in the menu bar, or the same shortcut.
- A result card appears: Copy (as a file), Show (reveals it in Finder), or GIF to convert it (12 fps, up to 960 px wide). Drag the thumbnail into any app.
Recordings are MP4 files at up to 60 fps, saved to your save folder. Very large regions (beyond 4K) use HEVC automatically. On macOS 15 and later, clicks are highlighted; turn this off in Settings → General.
Text & colors
Copy text from anything
Press ⇧⌘1 and then T (or ⌃⇧⌘1 directly) and drag over text anywhere: images, videos, PDFs, dialogs. The recognized text is copied and a message tells you how many words. Recognition runs on your Mac and detects the language automatically.
In the editor, Export → Recognize Text… shows the text so you can edit it, copy it, or Translate it with the system translator (macOS 14.4+, Pro).
Color picker
In the capture overlay, the loupe shows the hex color under the cursor. Press C to copy it, for example #5B5CF2.
The editor
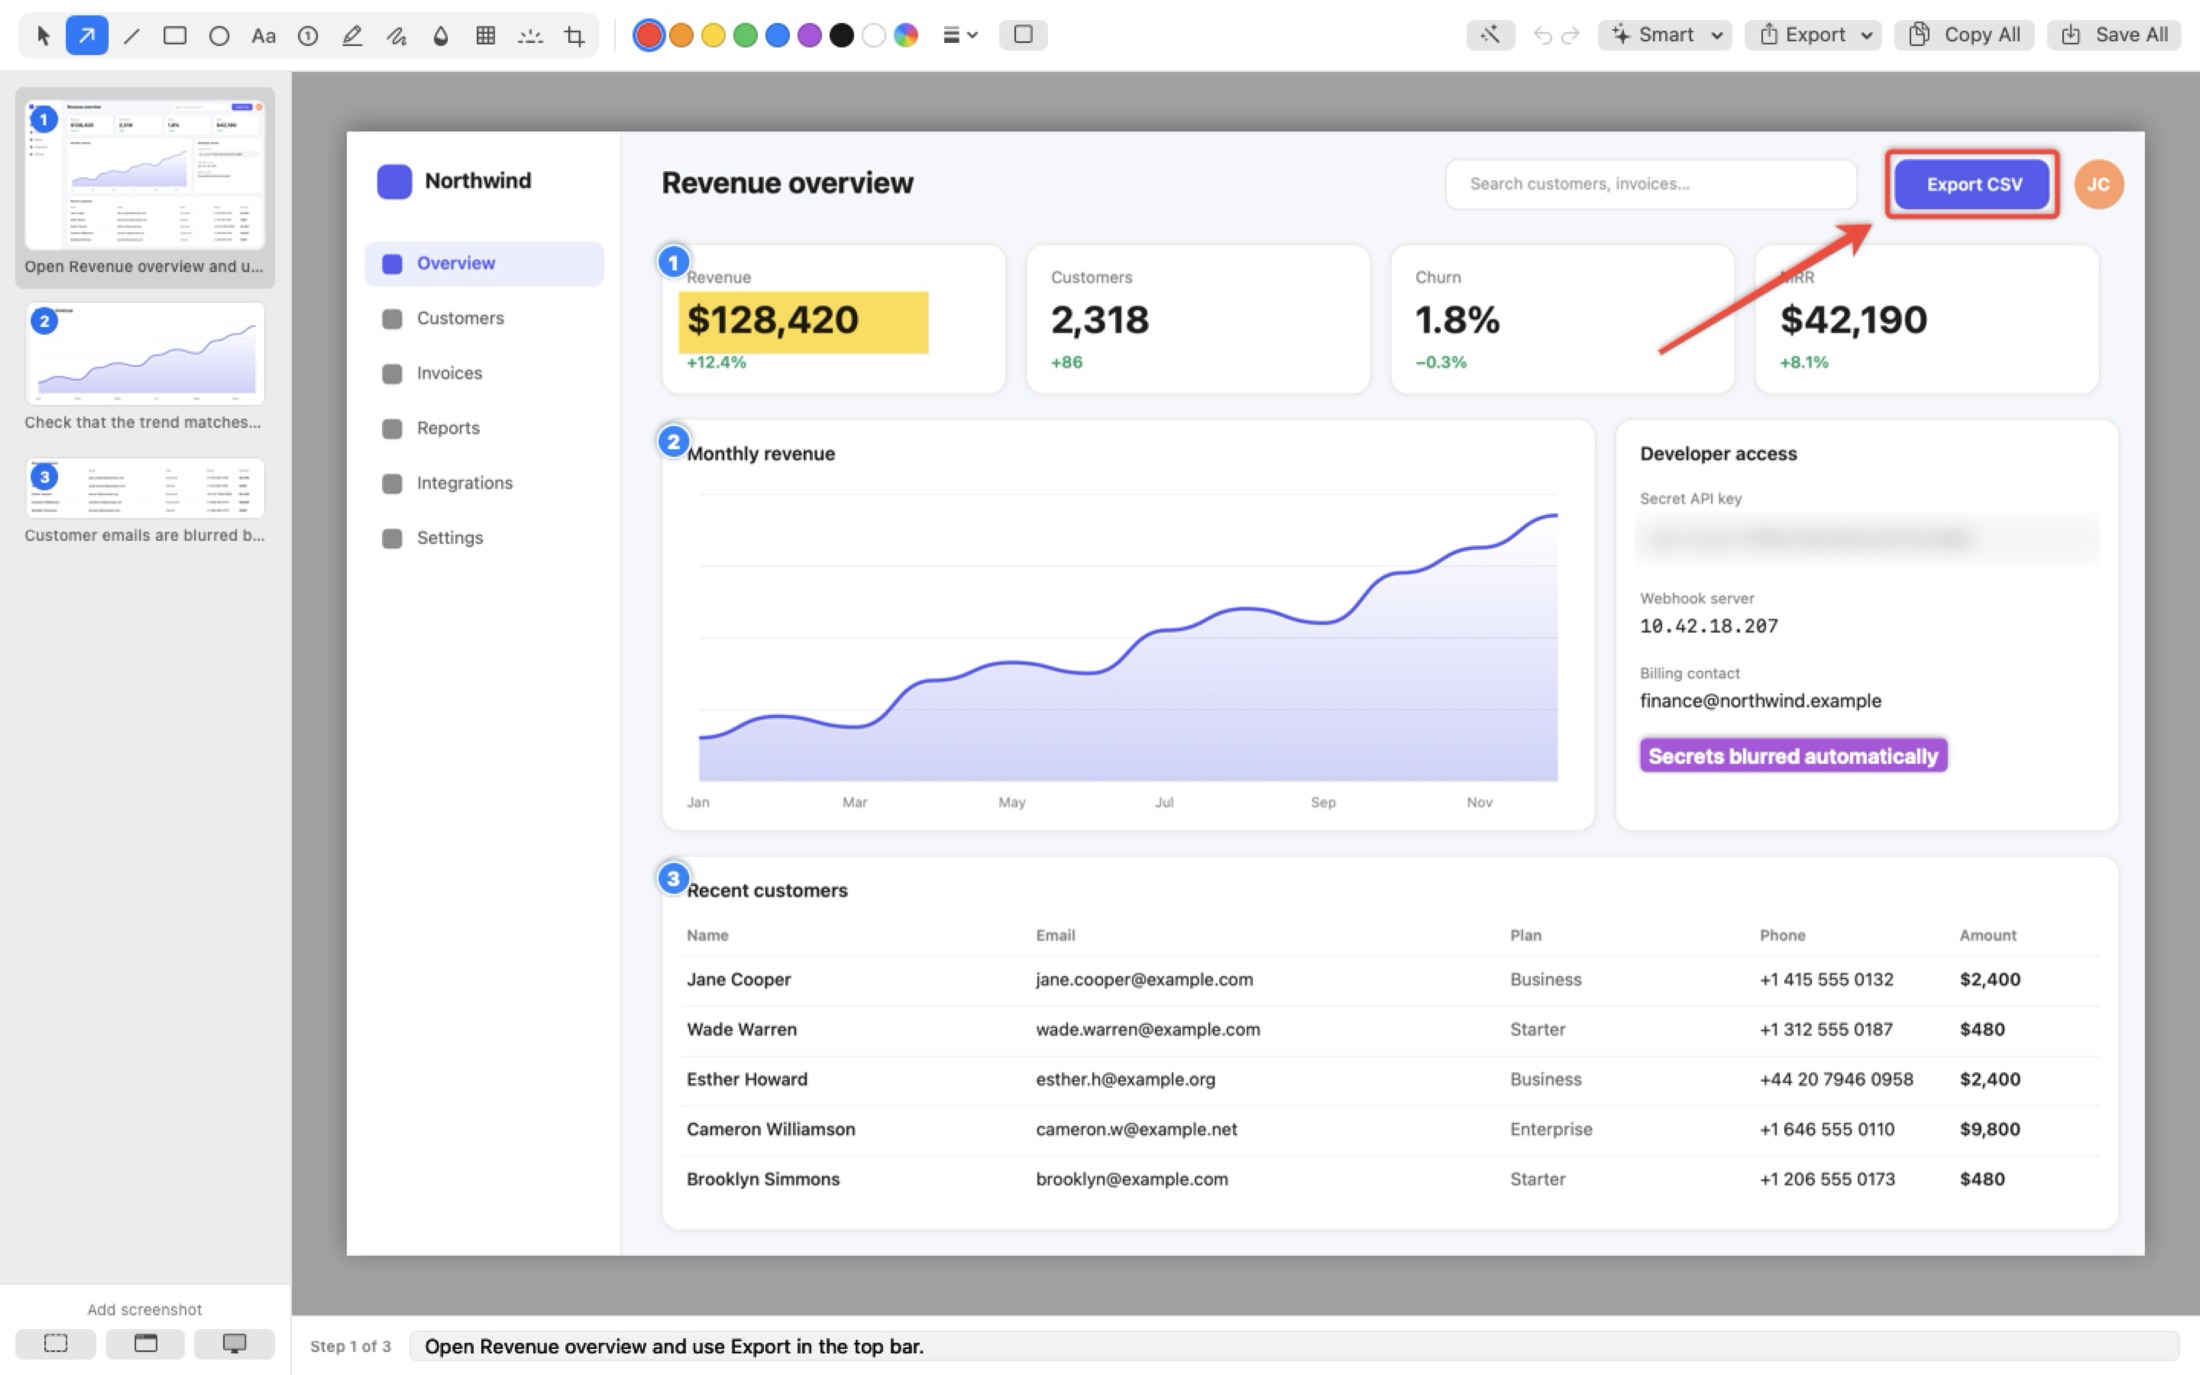
Opens from Quick Access (Annotate), from Stack mode, from History, or with Open Image to Annotate… in the menu bar for any image file.
Tools
| Tool | Key | How it works |
|---|---|---|
| Select & move | V | Click to select, drag to move, drag handles to resize. Double-click text to edit it. |
| Arrow | A | Drag from tail to tip. Hold ⇧ to snap to 45°. |
| Line | L | Drag. ⇧ snaps to 45°. |
| Rectangle / Ellipse | R / O | Drag. ⇧ makes a square or circle. Use Fill for solid shapes. |
| Text | T | Click and type; Return or clicking elsewhere finishes. With Fill on, the text gets a colored box. |
| Step counter PRO | N | Click to drop the next number: 1, 2, 3… |
| Highlight PRO | H | Drag a marker-style highlight over text. |
| Pen PRO | P | Freehand, smoothed automatically. |
| Blur / Pixelate | B / X | Drag over anything to hide it. |
| Spotlight PRO | S | Dims everything except the area you drag. |
| Crop | C | Drag the area to keep. Undo restores the original. |
Style
- Colors: eight presets plus the rainbow dot for any custom color. Changing the color while something is selected recolors it.
- Stroke width (≡ menu), Fill (square button) and text size (appears for text and steps) also apply to the selection.
Zoom
Screenshots open fitted to the window, never larger than their real size; very tall scrolling captures fit the width so they stay readable. Pinch or ⌘-scroll to zoom, scroll to move around, and use the View menu: Zoom In ⌘=, Zoom Out ⌘−, Actual Size ⌘0 and Zoom to Fit ⌘9.
Editing
- Undo / redo: ⌘Z / ⇧⌘Z or the arrows in the toolbar. Each image has its own history.
- Arrow keys nudge the selection 1 point (⇧: 10 points). Delete removes it. Esc deselects.
- Multiple images (stacks): click a thumbnail to switch, drag to reorder, right-click to remove. Type a caption per step at the bottom; captions appear in PDF guides.
- Add screenshot (bottom of the sidebar, shown for stacks and multi-image windows): the editor hides, you capture, and the new shot is added as the next step.
Smart tools (on-device AI) PRO
Find these in the Smart menu in the editor toolbar. Everything runs on your Mac with Apple's Vision frameworks.
Auto-Redact Sensitive Info
Finds and hides emails, phone numbers, card numbers (checked with the Luhn algorithm), API keys and tokens (OpenAI and Stripe style keys, GitHub, AWS, Slack, Google, JWTs and other long random strings), IP addresses and faces.
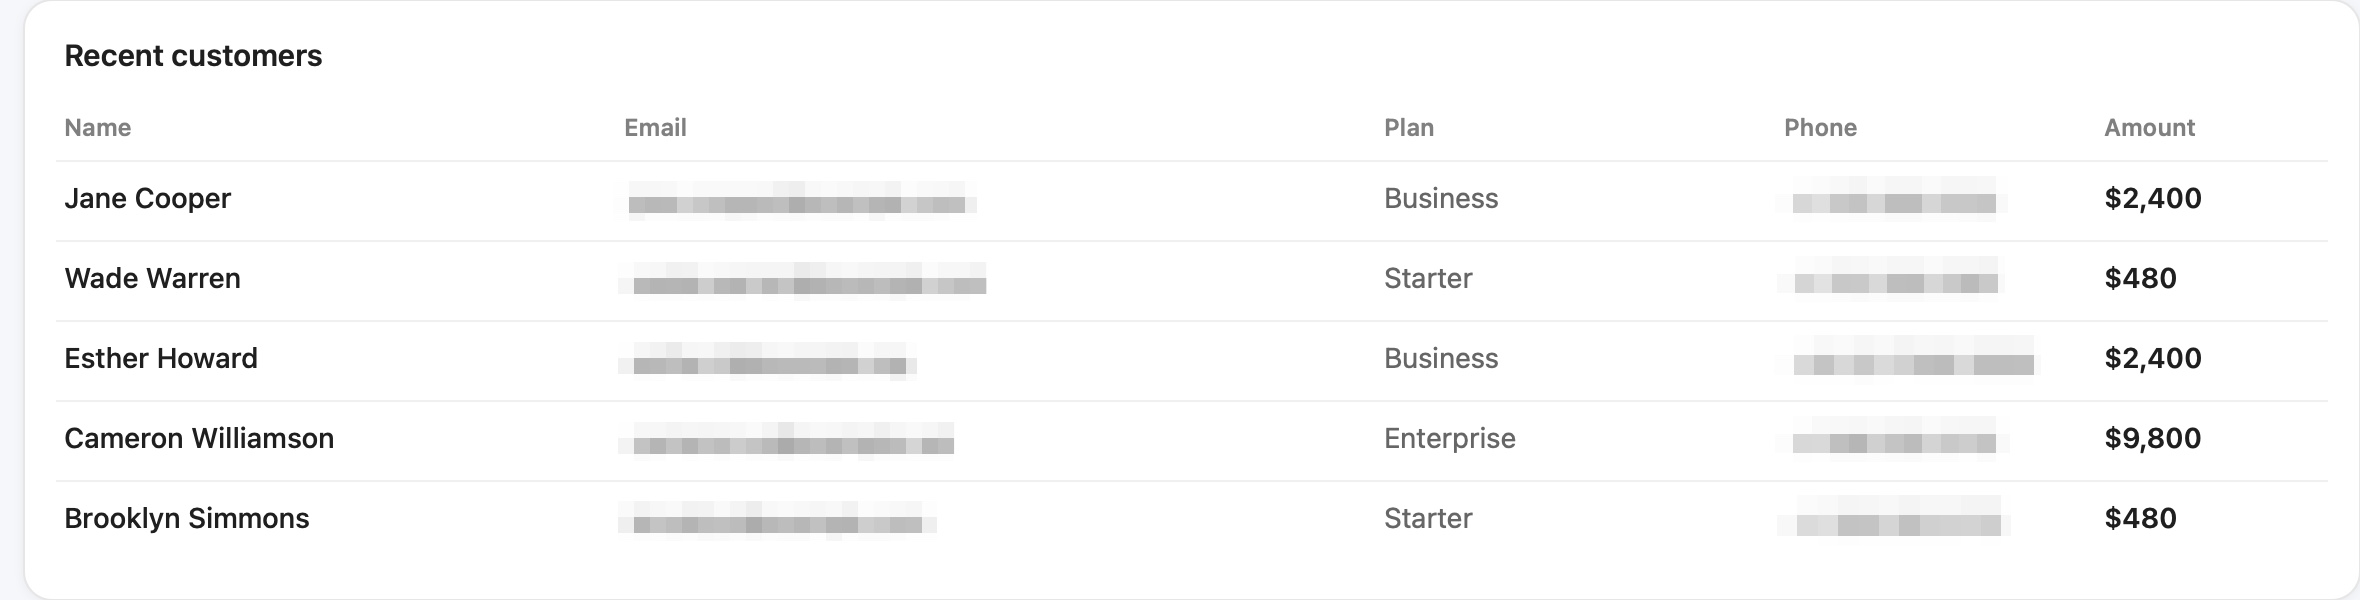
- The style is set in Settings → General → Redact sensitive info with: Pixelate (default), Blur or Solid. Solid boxes are the only style that can never be reversed. Use Solid for anything truly secret.
- Redactions are normal annotations: move, resize or delete them, and undo in one step.
- Always glance over the result. Detection is very good but not infallible, especially on tiny or stylized text.
Remove Background
Cuts out the main subject (people, objects, products) and adds it as a new image with a transparent background, leaving your original untouched.
Auto-Trim Borders
Crops away uniform margins around the content. Undo restores them.
Beautify PRO
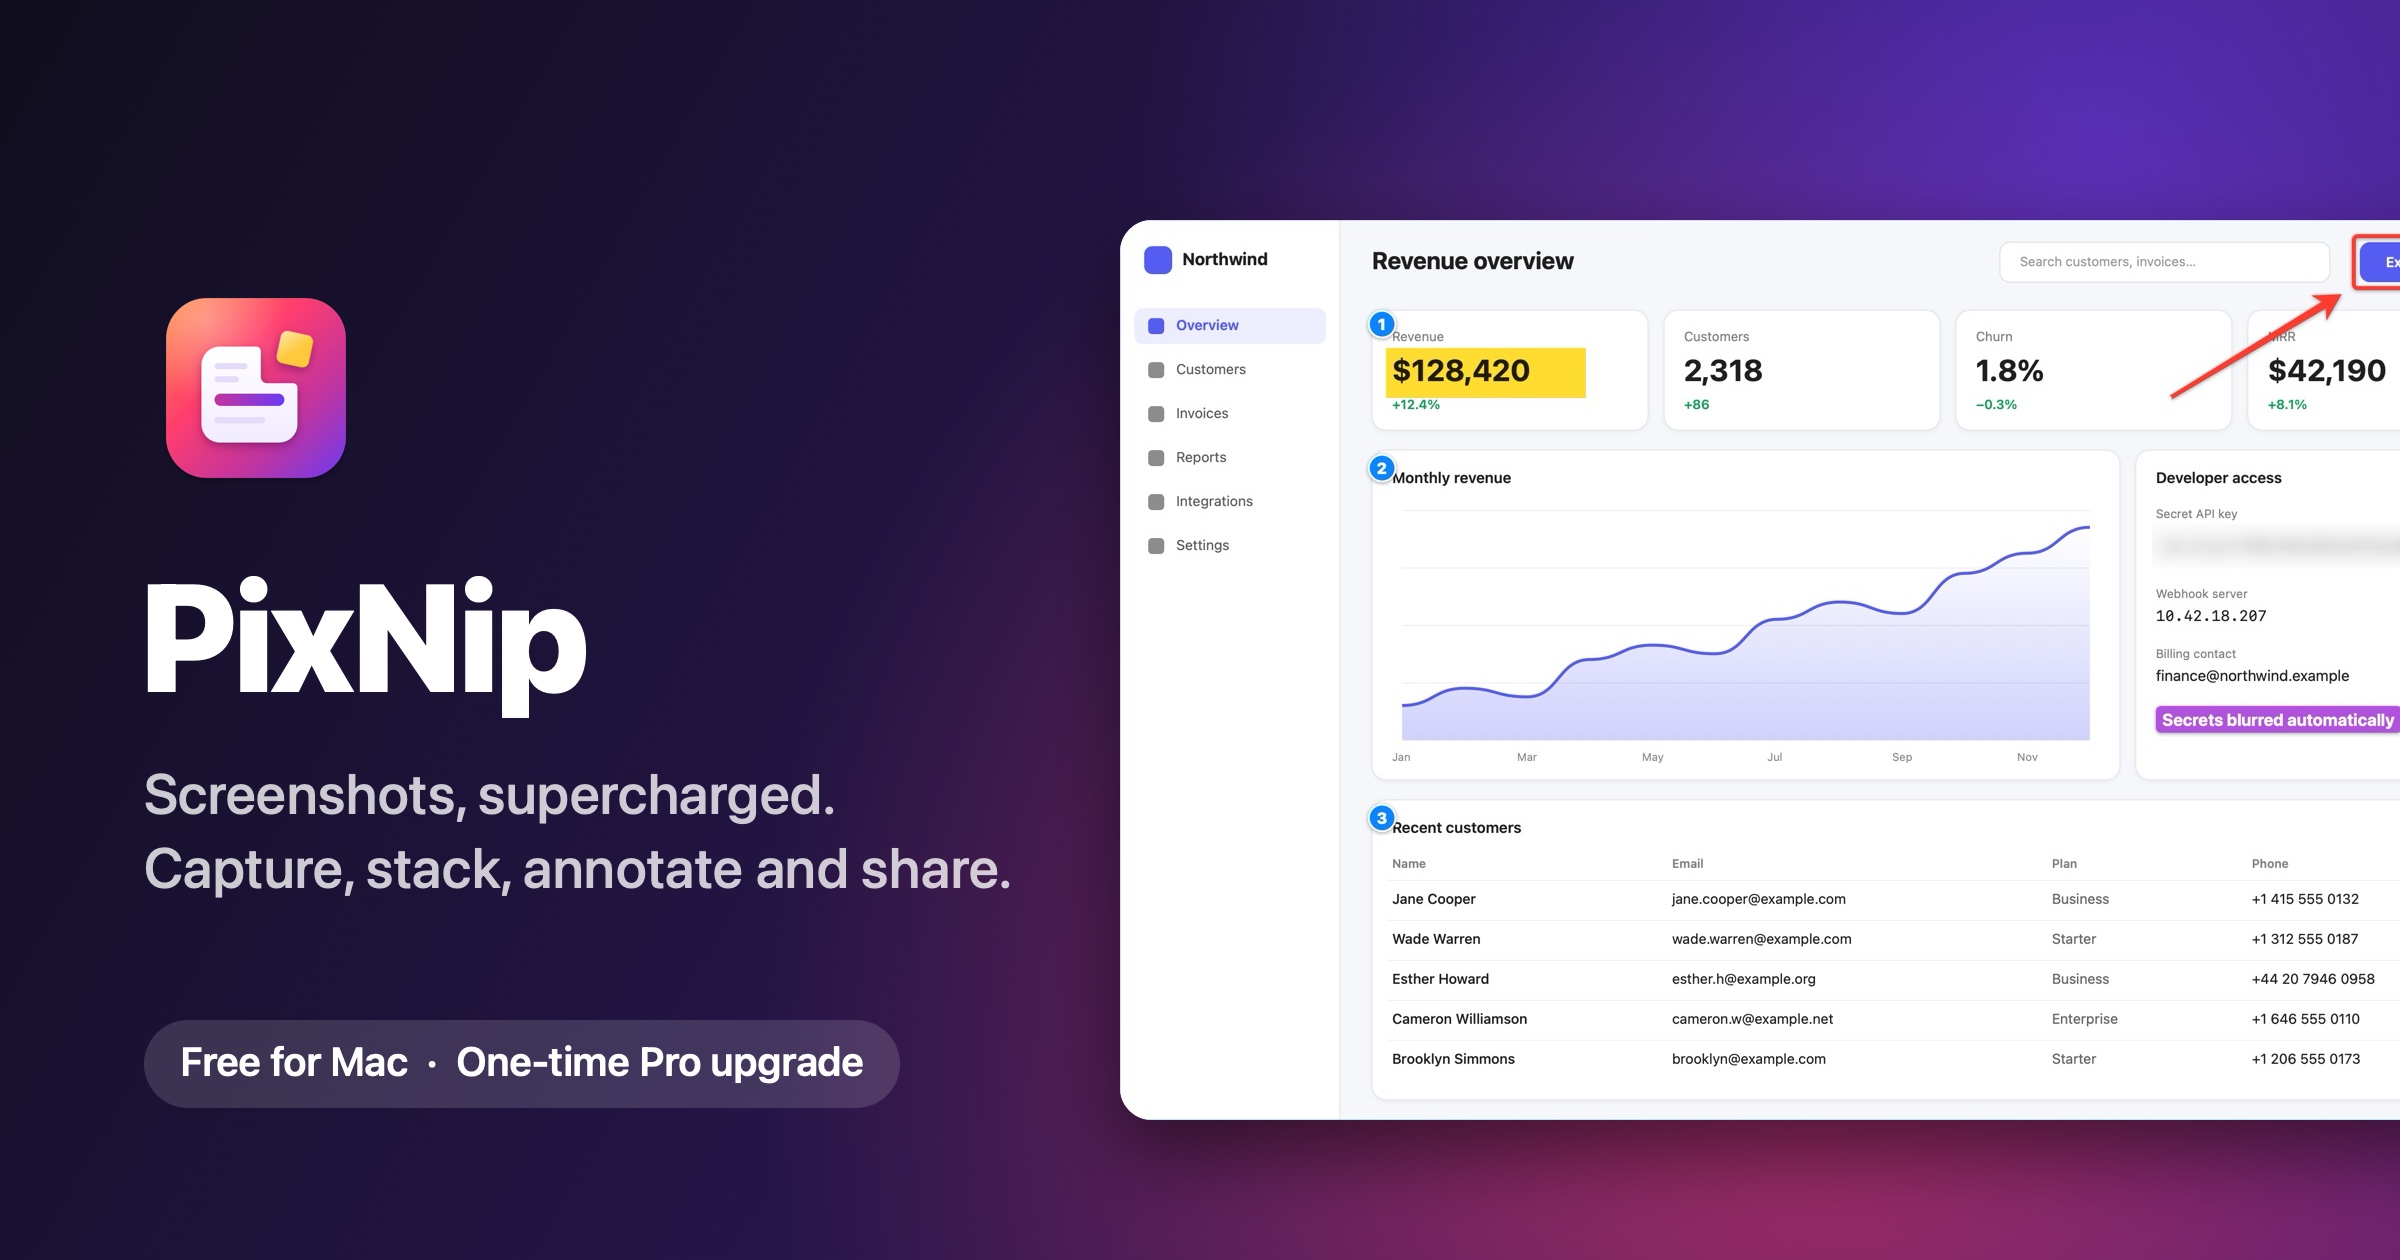
Click the wand button in the editor toolbar to open the Beautify panel, then switch Beautify on. On the free version you can preview every style on your own screenshot for free; copying, saving, exporting or pinning the framed version needs Pro. Or choose Copy, Save or Pin Without Frame, which turns the frame off for that window.
- Background: eight gradients, four solid colors, none (transparent), or your own.
- Your own backgrounds: click + in the background grid to add an image (a photo, your brand artwork, a wallpaper), a color or a two-color gradient, or simply drop image files onto the grid. They're saved to your personal library and appear next to the presets every time. Right-click one to remove it.
- Image backgrounds can Fill the canvas or Fit inside it (the edges get a soft blurred copy), and the Blur slider turns a busy photo into a gentle backdrop.
- Padding, Corner radius and Shadow sliders.
- Aspect ratio: Auto, 1:1, 4:3, 16:9 or 9:16 (stories). The screenshot is centered on the canvas.
The frame applies to every image in that editor window whenever you copy, save or export, so a whole stack gets a consistent look.
Your default style
Set up a look you love (background, padding, corners, shadow, ratio), then click Save as My Default. New editor windows start with it, and the Beautify step in workflows uses it. If you save it with Beautify switched on, every screenshot you open in the editor starts already framed (Pro). Perfect for on-brand screenshots with zero clicks. Reset to Default brings a window back to your saved style.
Copy, save & export
| Action | Where | Result |
|---|---|---|
| Copy / Copy All | Toolbar, ⌘C | The annotated image, or every image as files for pasting into Mail or Slack. |
| Save / Save All | Toolbar, ⌘S | Saved to your save folder as PNG or JPEG (Settings → General). |
| Save This Image As… | Export menu, ⇧⌘S | Choose name, folder and format. |
| Save All to Folder… | Export menu (several images) | Numbered files in a folder you pick. |
| Stitch into One Image… PRO | Export menu (several images) | Vertical, horizontal or grid, with spacing, padding, background and number badges. Live preview; Copy or Save. |
| PDF Step Guide… PRO | Export menu | One page per image with your caption and the screenshot ("Step N" when there are several); optional title. |
| Animated GIF… PRO | Export menu (several images) | Your shots as a looping GIF; choose seconds per frame. |
| Copy This Image | Export menu | Copies just the image you're viewing, in a multi-image window. |
| Copy Text (OCR) | Export menu | Copies the text recognized in the image. |
| Pin to Screen | Export menu | Floats the current image above everything. |

Pin to screen
Pin a capture from Quick Access, the editor, History, or Pin Clipboard Image in the menu bar. Pinned images float above all windows on every Space.
- Drag to move; scroll or pinch to zoom.
- Right-click for Copy, Save, Annotate…, Opacity (100–25%) and Close.
- Esc or a double-click closes the pin; ⌘C copies it.
History
Every capture is kept on your Mac and indexed by the text inside it. Open Capture History… from the menu bar.
- Search for any word that appeared in a screenshot, or for the app it was taken in.
- Click to select, ⌘-click to select several, double-click to annotate. With several selected, Annotate as Stack opens them together. Handy for assembling an email from shots you took earlier.
- Right-click for Copy, Pin, Show in Finder, Copy Recognized Text and Delete.
- Choose how long to keep captures in Settings → General → Keep capture history: Off, 1 day, 1 week, 30 days (the default) or Forever; 30 days and Forever need Pro. Turning it Off asks whether to delete what's already stored. The free version shows the last 7 days and never deletes anything because a trial ended.
Workflows PRO
A workflow chains a capture, optional processing and an output, and runs from one hotkey. Set them up in Settings → Workflows; run them from their hotkey, the menu bar's Workflows submenu, Shortcuts or the command line.
| Step | Options |
|---|---|
| Capture | Area, Window, Fullscreen or Scrolling |
| Process | Auto-trim borders · Redact sensitive info · Beautify (uses your default style) · Copy recognized text |
| Then | Copy to clipboard · Save to folder · Show Quick Access · Open in editor · Pin to screen · Add to stack |
| Run shell command | Any command; $PIXNIP_FILE is the path of the image: the saved file if the workflow saves to your folder (PNG or JPEG, per Settings), otherwise a temporary PNG. |
| Hotkey | Optional global shortcut |
PixNip ships with three examples: Redact & Copy, Pretty Window for Social and Full Page to Folder. Shell command examples:
# upload to your server
scp "$PIXNIP_FILE" me@server:/var/www/shots/

# open in another editor
open -a Preview "$PIXNIP_FILE"

# optimize the image (with ImageOptim installed)
open -a ImageOptim "$PIXNIP_FILE"CLI, URL scheme & Shortcuts PRO
Command line
Install from Settings → Automation → Install… (PixNip must be in your Applications folder; you'll be asked for your password once). Then:
pixnip area | window | fullscreen | text | scrolling
pixnip record                      # start / stop recording
pixnip stack [start|finish|discard]
pixnip workflow "Redact & Copy"
pixnip web https://example.com
pixnip open ~/Desktop/shot.png
pixnip history | settings
URL scheme
Great for Raycast, Alfred, BetterTouchTool and Keyboard Maestro:
pixnip://capture/area     pixnip://capture/window   pixnip://capture/fullscreen
pixnip://capture/text     pixnip://capture/scrolling
pixnip://record           pixnip://stack/start      pixnip://stack/finish
pixnip://workflow?name=Redact%20%26%20Copy
pixnip://web?url=https://example.com
pixnip://open?path=/Users/me/Desktop/shot.png
pixnip://history pixnip://settingsShortcuts app
PixNip adds these actions to Shortcuts: Take Screenshot (choose the type), Run PixNip Workflow, Start Screenshot Stack, Extract Text from Image (returns text) and Redact Sensitive Info (returns a redacted image). Use them in your own shortcuts and automations.
Settings reference
Open from the menu bar (Settings…) or with ⌘, while PixNip is active.
| Tab | Settings |
|---|---|
| General | After capture · Always copy to clipboard · Quick Access closes · Include shadow in window captures · Play capture sound · Redact sensitive info with · Show clicks in screen recordings · Keep capture history · Image format · Save to · Launch at login · Screen Recording permission status |
| Shortcuts | Use ⇧⌘3/⇧⌘4/⇧⌘5 for PixNip · a recorder for every action (click, then press the keys; × clears) · Restore Defaults |
| Workflows | Create, edit, reorder and delete workflows |
| Automation | Install the CLI · URL scheme reference · Shortcuts actions · reset permission for other apps |
| License | Plan and trial status · enter or remove a license key · check for updates |
Free vs Pro & licenses
Every new install gets 14 days of Pro. After that PixNip keeps working as the free version. Nothing is locked out or deleted. When the trial ends, PixNip shows once what you used Pro for (counted only on your Mac). Pro is a one-time purchase, with no subscription, and includes every 1.x update.
| Free | Pro (one-time purchase) |
|---|---|
| Area, window & fullscreen capture · Quick Access · pin | Scrolling capture · Capture Web Page · screen recording |
| Select, arrow, line, rectangle, ellipse, text, blur, pixelate, crop | Step counter, highlight, pen, spotlight |
| Copy text (OCR) | Auto-redact, background removal, auto-trim, translate |
| Stack mode up to 3 shots · copy & save | Unlimited stack · stitch, PDF guide & GIF export · Beautify (preview is free) |
| 7 days of history | Unlimited history · workflows · CLI, URL scheme & Shortcuts |
Activating
- Buy PixNip Pro; your license key arrives by email.
- Open Upgrade to Pro… from the menu bar (or Settings → License), paste the key, and click Activate.
A key works on up to 3 Macs. Moving to a new Mac? Click Deactivate This Mac on the old one first to free the slot. Your license is re-checked about once a week; being offline never removes it.
Privacy
- Screenshots, recordings and history stay on your Mac.
- Text recognition, redaction, background removal and translation run on-device.
- No analytics, tracking or accounts. PixNip only contacts the license server (when activating and about weekly) and the update feed, and loads pages you ask Capture Web Page to render.
Full details: Privacy policy.
Troubleshooting
Captures are black, or only show the wallpaper
Screen Recording permission is missing. Enable PixNip in System Settings → Privacy & Security → Screen & System Audio Recording, then quit and reopen PixNip. Settings → General shows the permission status.
A shortcut does nothing
Another app or macOS may own that combination. Settings → Shortcuts marks a key In use by another app when macOS won't give it to PixNip, and warns when two PixNip actions share a key. Pick a different one.
⇧⌘4 still opens Apple's screenshot tool
Apple's shortcuts are still on. In Settings → Shortcuts, click Open Keyboard Shortcuts… and switch off everything under Screenshots. The status turns green when PixNip has the keys.
Auto-scroll doesn't start
Allow PixNip under System Settings → Privacy & Security → Accessibility. Manual scrolling works without it.
Scrolling capture says "Lost track"
Scroll back up a little and continue more slowly. Animated content (videos, spinners) inside the area can also confuse stitching; select an area without them if possible.
Capture Web Page shows a login or cookie screen
It uses a clean session without your accounts. Use Scrolling capture in your own browser for logged-in pages.
Translate is missing
The system translator needs macOS 14.4 or later.
"This license key has reached the activation limit"
Deactivate PixNip on a Mac you no longer use (Settings → License → Deactivate This Mac), or contact support and we'll reset it.
Still stuck?
Email hello@pixnip.app with your macOS version and what you tried.